How to Make Easy Marbled Easter Eggs
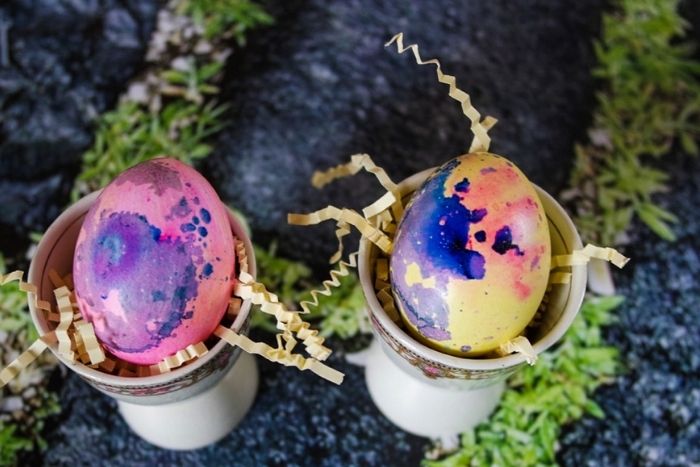
When it comes to decorating Easter eggs, my family has tried just about every technique you can imagine. From painted eggs, to mod podge, to glitter eggs, to melted crayons, we have tried them all! These marbleized Easter eggs are one of our favorite ways to decorate. You will love these marble effect Easter eggs because not only is it super simple to learn How To Make Easy Marbled Easter Eggs, but it’s also fun to make them and you will be left with incredible looking marbleized Easter eggs.

Recommended Grade Level:
This Easter egg decorating idea is great for kids of all ages. Even your toddlers can jump in and help mix the water, add food coloring, and use a spoon to scoop the eggs out of the water.
Easter egg decorating is not only a wonderful way for kids to express their creativity, but the whole process is also a perfect way to work on strengthening fine motor skills!
DIY Easter Egg Decorations:
Cool Easter egg designs don’t have to be hard or super complicated to make!
One of the most wonderful thing about decorating Easter eggs is that everyone can put their own special, creative twist on their eggs.
By adding just a few extra materials to your egg decorating, you can easily allow your kids to carry out their own unique Easter egg ideas.
- Stickers – Easter themed stickers, colorful dot stickers, or even letter stickers can make eggs extra personalized.
- Permanent markers- Markers are great for drawing small pictures, writing letters, or special Easter messages onto your eggs.
- Washi tape- Since washi tape comes in all different colors, patterns, and themes, the possibilities are really endless for using it to decorate and accent your dyed eggs.
- Hot glue and miscellaneous craft supplies- Use hot glue and old craft supplies you have lying around (such as foam stickers or googly eyes) to create little Easter egg critters or creatures.
- Glitter glue- Glitter glue is another easy way to cover eggs in stripes, polka dots, or another fun pattern.
Any of these materials can be added to your egg decorating for a fun twist on dyed Easter eggs. The best part is you probably already have some of them in your home arts and crafts stash.
How To Make Marble Looking Easter Eggs:
Supplies:
- White eggs (hard boiled)
- Food Coloring
- Oil
- Plastic Water Cups
- Small Bowls
Instructions:
Begin with cooled hard boiled eggs that have been dried off.
Mix one cup hot water, one teaspoon of vinegar, and 4 drops of food coloring into one of the plastic water cups. Repeat with all of the other colors in their own separate cups.
Add one egg to each cup and allow them to sit for 5 minutes. After 5 minutes, remove them from the cups and set them onto a paper towel to dry.
While your eggs are drying, prepare your bowls for marbleizing the eggs.


Manage the Mess!
Get tips, tricks, and tools to make messy play and art easy to manage.
Fill each bowl with about 1 inch of water. You do not want the bowls to be too full since you only want the egg to be about half way covered when you put it in.
Add about 2 tablespoons of oil to each cup and then drop 6-8 drops of food coloring into each cup.

Place one egg in each bowl. Using a spoon, spoon the oil/water/food coloring mixture over each egg.
Let the eggs sit for 5 minutes each and then roll the eggs over.

After the eggs have sat for another 5 minutes, take them out of the mixture and set them on paper towels to dry.
After about five minutes you can use paper towels to pat the eggs dry and remove any excess moisture.

Other Ideas For Making Marbled Easter Eggs:
- Dye your eggs and marbleize them using your favorite sports team’s colors.
- Use a permanent marker to write a special message on your Easter eggs after you are done adding the marble design.
- Talk about why the water and oil don’t mix together- a great opportunity for a small science lesson while you are waiting for your dyed egg.
More Easter Egg Activities You’ll Love:
- DIY Melted Crayon Easter Eggs
- Dye Easter Eggs with Vinegar and Food Coloring
- Dyeing Easter Eggs with Kool Aid
Looking For More Easter Egg Ideas?
How About Even More Easter Ideas?
- Easter Math Puzzle
- Easter Egg Mini Eraser Math Games
- Matching Easter Eggs Sensory Bin
- Easter and Spring Sensory Bin
- Easter Roll and Draw Art
Search All Activities
Looking for more? Find exactly what you need here:


