DIY Colorful Kool-Aid Dyed Easter Eggs
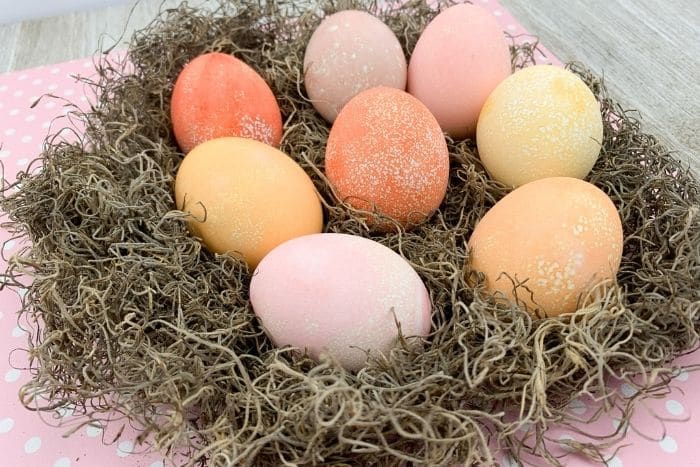
Dyeing Easter eggs is such a fun tradition! I know my growing kids still look forward to it every year. And they always complain about the smell of the vinegar! While I actually enjoy that tangy aroma, not everyone does. Dyeing Easter Eggs with Kool Aid is a fun twist on that traditional recipe.

Recommended Grade Level:
Wondering how in the world to dye Easter eggs with Kool-Aid?! All you need for this egg dyeing activity are boiled eggs, Kool-Aid packets in a variety of colors, containers, and water. This would be a great classroom activity, too! Teach your students how to make Kool-Aid-dyed Easter eggs for a fun learning activity.
Homemade Easter Egg Dye
Decorating Easter eggs with Kool-Aid is a fun alternative to store-bought egg-dyeing kits.
While most kits today are labelled ‘non-toxic,’ it certainly makes you think twice while working with toddlers, preschoolers, and young kiddos. We want to make sure that anything they are touching and eating is 100 percent safe.
Homemade dyes ensure that we know exactly what’s going into the mix.
Did you know you can make your own dye with food coloring as well? While this recipe is not vinegar-free, it does eliminate those store-bought tablets.
Another alternative includes keeping your dye 100 percent organic by using natural fruits and veggies that have deep color. Examples include blueberries, beets, turmeric, cabbage, or onions.

How to Make Easter Egg Dye with Kool Aid
Wondering how to dye Easter eggs without a kit, or how to dye Easter eggs without vinegar? It really couldn’t be easier! Follow the steps below to color Easter eggs with Kool Aid.
Supplies:
- Kool-Aid Packets
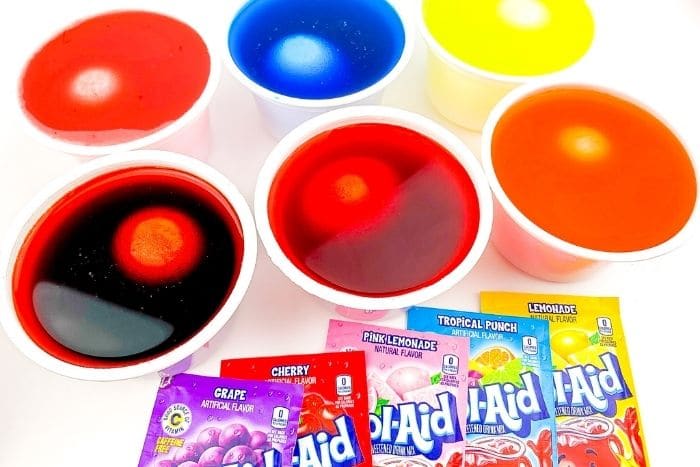
- Choose any flavors/colors you like! Note that the color of the packaging does not always mean that will be the color of the mix. The color of each packet is shown in the cup that the Kool-Aid man on the package is holding.
- Small Containers
- Make sure containers are deep enough for the eggs to be fully submerged. Consider recycled yogurt containers, plastic cups, or jars.
- Water
- Lined tray
- Any baking tray or foil/plastic tray will work. Line the tray with a paper towel to absorb excess water.
- Spoon

🌟 Manage the Mess!
Get tips, tricks, and tools to make messy play and art easy to manage.
Directions:
- Pour (non-boiling) water into each container, filling about ¾ full.
- Add a full packet of Kool-Aid mix to each container of water. Stir well with the spoon. Try not to mix the darker colors with the lighter colors when stirring other colors (use a paper towel to wipe the spoon between mixing)!
- Place an egg into each cup of the natural dye Kool-Aid mix. (Some eggs may float towards the surface. Just move them around during the dyeing process with a spoon to get an even color.)
- If you want your eggs to be lighter and not as speckled, leave the egg in for about a minute or less, checking the egg until the desired color is achieved.

Place the egg on the paper towel-lined tray. Move the egg around occasionally to avoid the paper towel leaving a print on the egg on one side.
*Note: For a speckled look, leave the egg in longer. When you take the egg out, you may notice a film around the egg. This is ok! Gently place the egg onto the paper towel and allow the egg to dry. Do not rub the egg, or the film will smear!
If this happens, hold the egg and wash it off to remove the film. Then, re-dye the Easter egg. Place the egg onto the paper towel carefully. Once dried, the egg will have a nice speckled look that does not smear.

Additional Decorating Ideas for Dyed Easter Eggs
Get creative while dyeing Easter eggs with Kool Aid packets by adding some embellishments.
- Wrap eggs with a rubber band before placing them in the dye. Remove the rubber band when the egg is fully dry to reveal a fun, striped design.
- Use a food coloring marker to write names or draw simple designs on dried eggs.
- Embellish eggs with Easter-themed stickers.
- Coat the egg with a mixture of glue/water, then roll the egg in glitter for a sparkly result.
Do you love this activity? Pin it for later!

More Easter Egg Activities You’ll Love:
Looking For More Easter Egg Ideas?
How About Even More Great Easter Ideas?
- DIY Glitter Easter Eggs
- Tie Dye Easter Eggs
- Galaxy Easter Egg Decorating
- Matching Easter Egg Sensory Bin
- Easter and Spring Sensory Bin
Search All Activities
Looking for more? Find exactly what you need here:


