Fun Fall Coffee Filter Craft for Kids
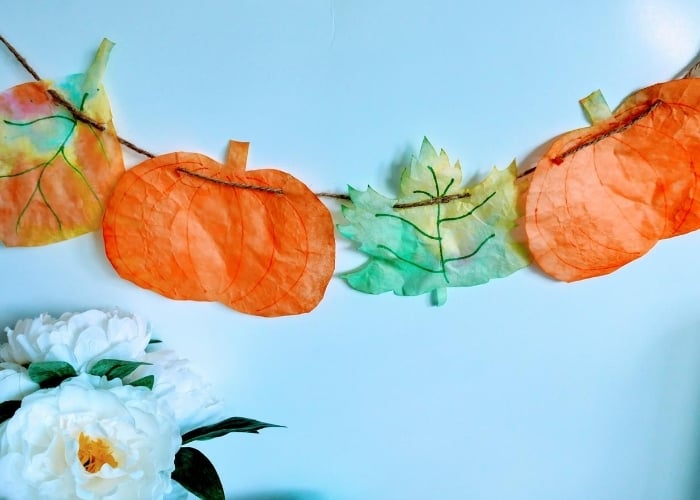
The sound of crunching of leaves… the smell of pumpkin spice… the feeling of the cool brisk air against your cheek… all signs that Fall is here! In my house we love getting into the spirit of the seasons. Crafts for kids are one of the many ways we love to celebrate the start of a new season! This Fall Coffee Filter Craft is a great way to create fall themed decorations that will welcome autumn into your home!

Recommended Grade Level:
Fall Coffee Filter Garland Craft Supplies:
- Parchment paper
- Large cookie sheet pan
- Coffee filters
- Scissors
- Small cups (4 plastic ones will work perfectly!)
- Pencil
- Food coloring (red, yellow, green)
- Medicine droppers
- Construction paper or another material to keep marker from bleeding onto your table
- Twine craft rope or yarn
- Small hole puncher
- Orange and green permanent markers (optional)
With just a few simple materials and crafting supplies that you probably already have lying around your home, you can create beautiful coffee filter crafts for Fall! Kids will love helping to create fall art garland to string around the house!
How To Make This Coffee Filter Art Project For Preschoolers:
Materials:
- parchment paper
- large cookie sheet pan
- coffee filters
- scissors
- small cups (4 plastic ones will work perfectly!)
- pencil
- food coloring (red, yellow, green)
- medicine droppers
- construction paper or another material to keep marker from bleeding onto your table
- twine craft rope or yarn
- small hole puncher
- orange and green permanent markers (optional)

Instructions:
This is such a fun fall craft for kids to make! Let’s get started!
Using parchment paper, cover the large cookie sheet leaving about 1 inch extra hanging over the sides.
Let’s Create Pumpkins!
Take four coffee filters and stack them on top of one another. Fold them in half and using the pencil draw half of a pumpkin onto the filter.
Cut along the pencil drawn line. (or if your child is able to safely use scissors let them cut!) This will give you four full, equal sized pumpkins!

This next step is completely optional! It all depends on if you want your pumpkins to have ribs or not. If you do not want your pumpkins to have ribs skip this step.
Put your pumpkins on top of construction paper or whatever material you choose that will prevent the marker from bleeding through onto the table. Using the orange permanent marker, draw semi-circles to create ribs on the pumpkins.
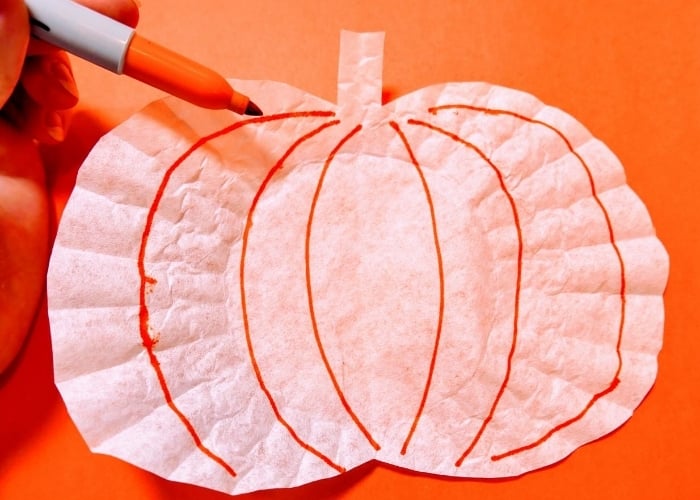
Place your pumpkins (with or without ribs) onto the parchment paper lined cookie sheet. Leave space between them!
Now it is time to prepare your colored water!
Take the four cups and put about half an inch to an inch of water in the bottom of them.
Put five or more drops of red, yellow, and green food coloring into three separate cups (one color for each cup). You will want to make sure the colors are very dark since they will lighten once they are applied to the coffee filter.
Add a mixture of red and yellow food coloring to make orange in the fourth cup.
Once all your colored water is ready, use the medicine dropper (great exercise for fine motor skills!!) to drop orange water onto the pumpkins. Drop green water onto the stems.

Let’s Create Leaves!
Stack four new coffee filters and fold them in half. Use the pencil to draw half of a leaf onto the coffee filter. (Note: you can make all of your leaves the same type, or make a combination of different leaf shapes!)
Cut out the leaf! You will now have four, full sized leaves!

Optional step! Add veins to your leaves! If you want the leaves to have veins, use the green permanent marker to draw them. Be sure to use the construction paper or another material to protect your table from getting marker on it!
Add your leaves to the large cookie sheet with parchment paper where your pumpkins already are. If you run out of space you may need to line another cookie sheet with parchment paper.
Using the medicine dropper, add drops of all four colors of water to decorate the leaves.

Now It’s Time to Bake!
Preheat your oven to 170 degrees.
Once preheated, place the cookie sheet in the oven to bake. You will need approximately 5-6 minutes if the pumpkins and leaves are lightly wet, and about 10-15 minutes if they are extremely wet.
Check the pumpkins and leaves after about 6 minutes in the oven. Blot excess water from the cookie sheet with a paper towel if needed!
Finally, It’s Assembly Time!
After the pumpkins and leaves are completely dry use the hole punch to put two holes at the top of each one. (the holes should be about 1-2 inches apart)

String the twine or yarn through the holes, alternating between pumpkins and leaves.
Finally, find the perfect spot in your home to hang your garland and display your beautiful autumn craft!
More Coffee Filter Activities For Preschoolers:
There are so many options for coffee filter art for preschool age kids! Everyone in your family will be begging to join in the fun with these easy crafts for kids!
- Create a spring tree with coffee filter flowers or a fall tree with tie dye coffee filter leaves!
- Embrace the cold winter season with coffee filter snowflake decorations!
- A little paint and a paintbrush can make a simple and easy painted coffee filter art project!
- Engage in some process art with your child! Let them be the creators! Simply supply them with some coffee filters, markers, crayons, construction paper, glue, and scissors (depending on their age!) and allow them the freedom to create their own masterpiece!
Try These Fall Crafts Next
Fall Sensory Ideas
Try these fall theme activities too
- Fall Theme Initial Blends Game CCVC/CCCVC
- Fall Theme CVC Word Families Board Game
- Fall Theme Addition to 10 Printables
- Free Printable Fall Theme Preschool Board Game
- Fall Theme Preschool Number Tracing Worksheets
Search All Activities
Looking for more? Find exactly what you need here:


